🐥 gm hatchlings!!
Today’s guide will be covering the Avalanche network, and how to setup and bridge your Ethereum (ETH) over to AVAX - the network’s native coin used for transactions on the network!
Setting up your wallet and bridging (converting one network’s currency to another) can be daunting, but fear not! Grab a desktop/laptop, a snack, and follow our bushy tail down the rabbithole: we shall guide you! 🐇🕳
Be sure to check out the prerequisite tutorials to get setup first
Before diving in, lets learn a little more about the Avalanche network, and why it exists!
🤔 What is Avalanche (AVAX)?
Avalanche is blockchain platform that focuses on blazing fast transaction speeds, super low transaction fees, and being eco-friendly by being able to process thousands of transactions per second!
For comparison, transacting on the Ethereum blockchain can be costly, and the network can only process around 15-45 transactions per second.
Avalanche, and many other Layer 2 networks work to lower transaction fees and drastically increase the number of transactions that can be made per second making it cheaper and faster to use!
🐇🕳 To dive deeper and learn more about the difference between Layer 1 and Layer 2 networks visit here!
🤩 Wow! How Do I Set Up My Wallet?
Purchasing AVAX lets you use it to transact on their network, and interact with the many decentralized apps (dapps) on Avalanche.
First make sure you have a MetaMask account, visit our tutorial here to help get set up!
- Go into your MetaMask wallet and click the Ethereum Mainnet dropdown button at the top to open the Network Menu
- You can use this menu to switch between networks (Ethereum & Avalanche)
- Click Add Network at the bottom
- You will be prompted with this screen asking you enter a few details

To add Avalanche as a network, copy and paste the details below into the boxes or copy and paste them directly from Avalanche’s website here.
- Network Name: Avalanche Network
- New RPC URL: https://api.avax.network/ext/bc/C/rpc
- ChainID: 43114
- Symbol: AVAX
- Explorer: https://snowtrace.io/

Once you have copied and pasted the information into the boxes below click save to add the network.

🐇🕳 Alternatively, you can also visit chainlist.org, search for Avalanche Mainnet, and connect you wallet to automatically add it as a network!

You should get a confirmation message in the bottom right of the MetaMask website, and you should now be able to switch to the Avalanche Network in the Network Menu.
🎊 Congratulations!! You have added the Avalanche Network to your wallet!
💃 Sweet! Now How do I get AVAX?
- First things first, you want to make sure you have some Ethereum in your wallet
- Next, we are going to want to wrap our ETH for wETH (a cross-platform token that represents ETH’s value exactly)
- 🐇🕳 wETH (Wrapped Ethereum) is a ERC-20 token representing ETH 1:1 that allows for more functionality across platforms that handle ERC-20 tokens like Avalanche.
- To read more about wETH, and why it exists visit their website here
- 🐇🕳 wETH (Wrapped Ethereum) is a ERC-20 token representing ETH 1:1 that allows for more functionality across platforms that handle ERC-20 tokens like Avalanche.

- Go to your MetaMask wallet, and click the Swap button to the right
- Under Swap to, click the dropdown and type wETH
- Select WETH
- Note*:* Make sure it says Verified on x number of sources. This means MetaMask has verified that the token you are swapping to is legit!
- Enter the amount of ETH you would like to swap, and click Review Swap to open the confirmation menu
- Click Swap to confirm

😎 Nice! You have wrapped ETH into wETH!
You should see your wETH balance under Assets!

🌁 How to bridge wETH to AVAX
Okay, now that we have some wETH, it’s time to bridge it into AVAX!
- Visit https://bridge.avax.network/, the official Avalanche Bridge
- Next, connect your MetaMask to the dapp
- Once connected, click on the dropdown next to 1INCH
- Type wETH and click WETH from the list (you should see your wETH balance)
- Enter how much wETH you would like to bridge to AVAX and click Transfer

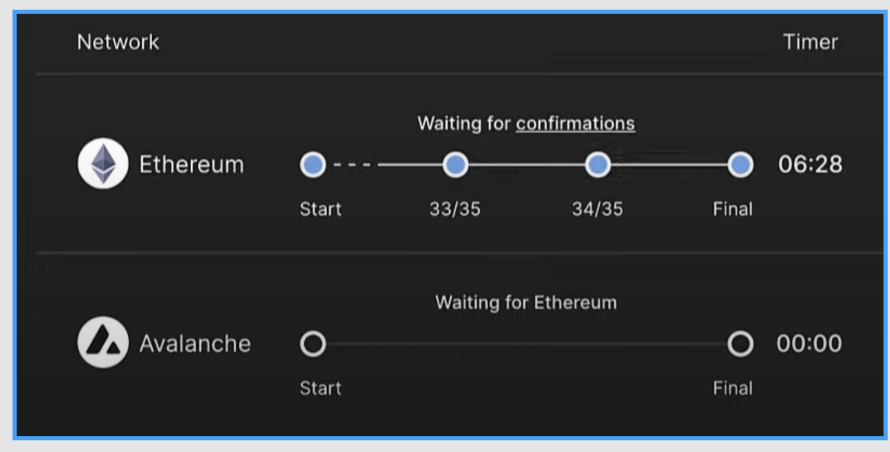
A Transaction Status screen will open, showing you the progress of your bridge
- Note: The Ethereum transaction should take around 10-15 minutes, while the Avalanche transaction should only take a few seconds
- To learn more, visit the official Avalanche Bridge FAQ page here

💃 Yay!! You have officially converted your ETH to AVAX!
You can now use it to interact with the Avalanche network and its various dapps!
To view your AVAX balance:
- Go back to your MetaMask wallet
- Click the Ethereum Mainnet dropdown to switch networks
- You should see your AVAX balance!

That’s it folks!! I hope you enjoyed this guide down the Avalanche rabbithole!
Please be sure to check out our Mirror articles and follow us on Twitter for all things crypto and web3.
💕 Stay curious frens!